> ## Documentation Index
> Fetch the complete documentation index at: https://docs.macroscope.com/llms.txt
> Use this file to discover all available pages before exploring further.
# Integrations
> Connect your tools to give the agent more context and capabilities
Each integration gives the agent access to new data and actions. All integrations are configured in **Settings → Connections**. For a full list of what the agent can do with each tool, see the [tools reference](/agent#tools).
## GitHub
Connected automatically during setup. No additional configuration needed.
## Slack
The primary way most teams interact with Macroscope. DM Macroscope or tag `@Macroscope` in any channel to query the agent.
Macroscope also streams real-time code activity into Slack channels via `/macroscope` commands. Use `/macroscope subscriptions` to view a channel's subscriptions, or `/macroscope help` for the full command list.
* `/macroscope subscribe `: all activity from a repo
* `/macroscope subscribe-commits `: commit summaries (includes linked Jira and Linear tickets)
* `/macroscope subscribe-prs `: PR activity, with live emoji reactions as PRs are ✅ approved, 💬 commented, or 🚀 merged
* `/macroscope subscribe-build-failures `: build failures
Add `--paths=` to any command to filter to specific parts of a repo (e.g. `--paths=/frontend`).
A Slack admin can connect Slack in **Settings → Connections → Slack**.
## Linear
The agent can look up issues, track project progress, and create new issues. When you connect Linear, you choose which teams Macroscope can access.
Scroll down to the **Linear** section.
Click **Connect Linear** and sign in with your Linear account.
Linear will prompt you to choose which teams Macroscope can access. Select **all public teams** or **only select teams**.
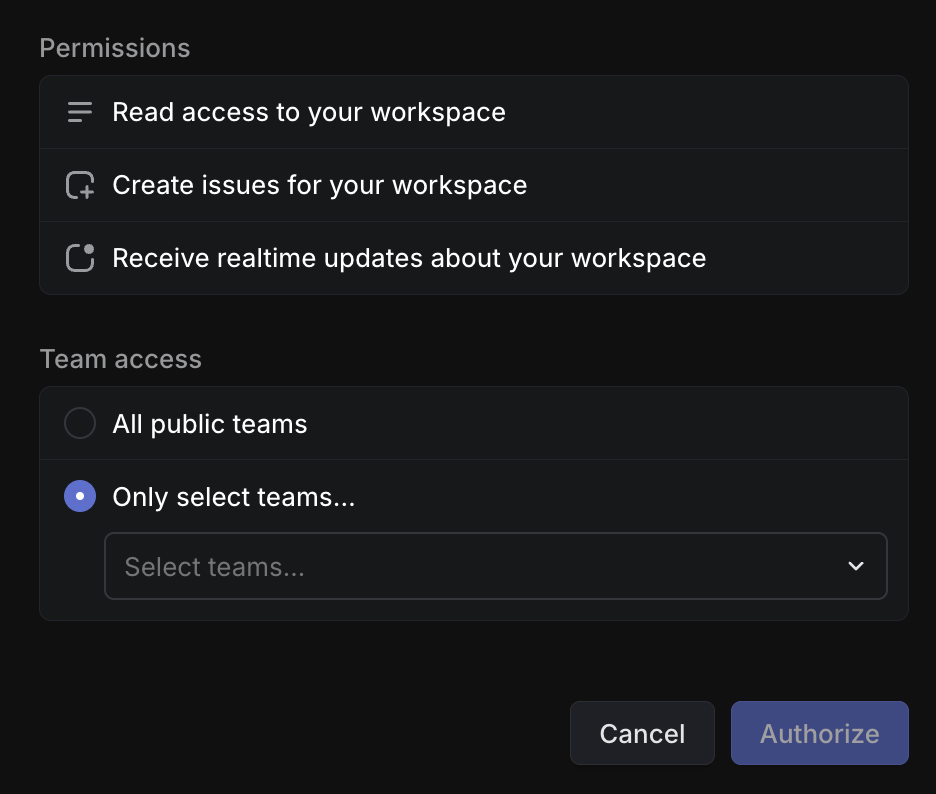 Click **Authorize** to complete.
## Jira
The agent can look up tickets, track project progress, and create new issues. Macroscope inherits the permissions of the Jira account that authorizes the integration.
We recommend creating a dedicated Jira user for Macroscope, scoped to the specific Projects you want Macroscope to access. For Google Workspace teams, create an email alias like `linda+macroscope@yourcompany.com` and use it for the Jira account.
Scroll down to the **Jira** section.
Make sure you are logged out of any personal Jira accounts first. Click **Connect Jira** and sign in with the account you want to authorize for Macroscope.
In some cases, a Jira site admin may need to manually authorize the connection:
1. Go to Atlassian Administration → Apps → \[your-site].atlassian.net → Connected apps
2. Find Macroscope and click Authorize/Allow for the site.
You'll see a list of Projects that Macroscope has been granted access to. These will be accessible to anyone on your team with Macroscope access.
To modify the list, update the permissions of the authorizing Jira account and re-authorize.
Click **Confirm Access** to complete.
## LaunchDarkly
The agent can list feature flags, projects, and environments, and check flag status and targeting rules.
Scroll down to the **LaunchDarkly** section.
In LaunchDarkly, go to **Settings → Authorization → Create Token**. Assign the **Reader** role.
Copy the token and paste it into the Macroscope connection modal. Click **Connect**.
## PostHog
The agent can query product analytics events, analyze trends, and inspect feature flags.
Scroll down to the **PostHog** section.
In PostHog, go to **Settings → Personal API Keys → Create**. Copy the key.
Use an organization-scoped API key for flexibility across multiple projects.
Select your region (US or EU), paste your API key, and click **Next**.
Macroscope will auto-fetch your projects. Select a default project and click **Connect**.
## Sentry
The agent can search error issues across projects, view issue details and event history, and investigate crashes and exceptions.
Scroll down to the **Sentry** section.
Choose your Sentry region: **sentry.io**, **us.sentry.io**, **de.sentry.io**, or enter a custom URL for self-hosted instances.
In Sentry, go to **Settings → Auth Tokens** and create a token with the following scopes: `event:read`, `project:read`, `org:read`.
Paste the auth token, enter your organization slug, and click **Connect**. Macroscope will validate your credentials automatically.
## BigQuery
The agent can browse datasets, inspect table schemas, and run read-only SQL queries. Answers include a methodology summary so you can verify the analysis.
Scroll down to the **BigQuery** section.
In Google Cloud Console, create a service account with **BigQuery Data Viewer** and **BigQuery Job User** roles. Generate a JSON key file.
Enter a connection name, your GCP Project ID, and upload the service account JSON key (or paste it directly). Optionally add prompt instructions to give the agent context about your data.
Click **Create** to complete.
## GCP Cloud Logging
The agent can search and filter application logs across connected GCP projects.
Scroll down to the **GCP Cloud Logging** section.
In Google Cloud Console, create a service account with **Logs Viewer** role. Generate a JSON key file.
Enter a connection name, your GCP Project ID, and upload the service account JSON key (or paste it directly). Optionally add prompt instructions to give the agent context about your logs.
Click **Create** to complete.
## Amplitude
The agent can run event segmentation queries, analyze conversion funnels and retention, and inspect individual user event streams.
Scroll down to the **Amplitude** section.
In Amplitude, find your **API Key** and **Secret Key** in your project settings.
Enter a connection name, select your region (US or EU), paste your API Key and Secret Key, and optionally add prompt instructions.
Click **Create** to complete.
## MCP Connectors
Connect any [MCP-compatible server](https://modelcontextprotocol.io/) to extend the agent with custom tools (e.g. Datadog, PagerDuty, or your own internal APIs). Configure MCP Connectors from **Settings → Connections → MCP Servers** (admin only).
Scroll down to the **MCP Connectors** section.
Paste the MCP server URL and click **Discover**. Macroscope will auto-detect the server's authentication method.
Depending on the server, you may need to provide OAuth credentials (Client ID and Secret), custom headers, or no authentication.
Review the tools the server provides. Toggle off any tools you don't want the agent to use. Click **Connect**.
### Access Controls for Workspace-Scoped MCP Connectors
By default, all workspace members can use an MCP connector's tools. To restrict access to specific users:
1. Open the MCP connection in edit mode.
2. Switch to the **Access** tab.
3. Add users to the allow list.
Only users on the allow list can invoke the connector's tools. Connections with restricted access display a badge and tooltip in the connection list so admins can see which connectors are limited at a glance.
### Personal MCP Connections
Personal connections are MCP servers you connect for yourself, separate from the workspace connectors your admins manage. Use them to give the agent your own tools, like Stripe, Notion, Linear, or Sentry, or your own internal APIs, when it answers your questions. Set them up from **Settings → Personal**, no admin required.
| | Workspace connector | Personal connection |
| ------------ | ---------------------------------------- | ------------------- |
| Set up by | Admins | You |
| Available to | All workspace members (or an allow list) | Only you |
| Runs as | Shared workspace identity | Your own identity |
Personal connections support any public HTTPS server that implements OAuth 2.1. Macroscope discovers the server's authorization endpoints and registers a client automatically, so there are no client credentials to enter: paste the server URL, complete the OAuth consent flow, and the connection is ready. Reconnect or disconnect at any time from the same page.
Click **Authorize** to complete.
## Jira
The agent can look up tickets, track project progress, and create new issues. Macroscope inherits the permissions of the Jira account that authorizes the integration.
We recommend creating a dedicated Jira user for Macroscope, scoped to the specific Projects you want Macroscope to access. For Google Workspace teams, create an email alias like `linda+macroscope@yourcompany.com` and use it for the Jira account.
Scroll down to the **Jira** section.
Make sure you are logged out of any personal Jira accounts first. Click **Connect Jira** and sign in with the account you want to authorize for Macroscope.
In some cases, a Jira site admin may need to manually authorize the connection:
1. Go to Atlassian Administration → Apps → \[your-site].atlassian.net → Connected apps
2. Find Macroscope and click Authorize/Allow for the site.
You'll see a list of Projects that Macroscope has been granted access to. These will be accessible to anyone on your team with Macroscope access.
To modify the list, update the permissions of the authorizing Jira account and re-authorize.
Click **Confirm Access** to complete.
## LaunchDarkly
The agent can list feature flags, projects, and environments, and check flag status and targeting rules.
Scroll down to the **LaunchDarkly** section.
In LaunchDarkly, go to **Settings → Authorization → Create Token**. Assign the **Reader** role.
Copy the token and paste it into the Macroscope connection modal. Click **Connect**.
## PostHog
The agent can query product analytics events, analyze trends, and inspect feature flags.
Scroll down to the **PostHog** section.
In PostHog, go to **Settings → Personal API Keys → Create**. Copy the key.
Use an organization-scoped API key for flexibility across multiple projects.
Select your region (US or EU), paste your API key, and click **Next**.
Macroscope will auto-fetch your projects. Select a default project and click **Connect**.
## Sentry
The agent can search error issues across projects, view issue details and event history, and investigate crashes and exceptions.
Scroll down to the **Sentry** section.
Choose your Sentry region: **sentry.io**, **us.sentry.io**, **de.sentry.io**, or enter a custom URL for self-hosted instances.
In Sentry, go to **Settings → Auth Tokens** and create a token with the following scopes: `event:read`, `project:read`, `org:read`.
Paste the auth token, enter your organization slug, and click **Connect**. Macroscope will validate your credentials automatically.
## BigQuery
The agent can browse datasets, inspect table schemas, and run read-only SQL queries. Answers include a methodology summary so you can verify the analysis.
Scroll down to the **BigQuery** section.
In Google Cloud Console, create a service account with **BigQuery Data Viewer** and **BigQuery Job User** roles. Generate a JSON key file.
Enter a connection name, your GCP Project ID, and upload the service account JSON key (or paste it directly). Optionally add prompt instructions to give the agent context about your data.
Click **Create** to complete.
## GCP Cloud Logging
The agent can search and filter application logs across connected GCP projects.
Scroll down to the **GCP Cloud Logging** section.
In Google Cloud Console, create a service account with **Logs Viewer** role. Generate a JSON key file.
Enter a connection name, your GCP Project ID, and upload the service account JSON key (or paste it directly). Optionally add prompt instructions to give the agent context about your logs.
Click **Create** to complete.
## Amplitude
The agent can run event segmentation queries, analyze conversion funnels and retention, and inspect individual user event streams.
Scroll down to the **Amplitude** section.
In Amplitude, find your **API Key** and **Secret Key** in your project settings.
Enter a connection name, select your region (US or EU), paste your API Key and Secret Key, and optionally add prompt instructions.
Click **Create** to complete.
## MCP Connectors
Connect any [MCP-compatible server](https://modelcontextprotocol.io/) to extend the agent with custom tools (e.g. Datadog, PagerDuty, or your own internal APIs). Configure MCP Connectors from **Settings → Connections → MCP Servers** (admin only).
Scroll down to the **MCP Connectors** section.
Paste the MCP server URL and click **Discover**. Macroscope will auto-detect the server's authentication method.
Depending on the server, you may need to provide OAuth credentials (Client ID and Secret), custom headers, or no authentication.
Review the tools the server provides. Toggle off any tools you don't want the agent to use. Click **Connect**.
### Access Controls for Workspace-Scoped MCP Connectors
By default, all workspace members can use an MCP connector's tools. To restrict access to specific users:
1. Open the MCP connection in edit mode.
2. Switch to the **Access** tab.
3. Add users to the allow list.
Only users on the allow list can invoke the connector's tools. Connections with restricted access display a badge and tooltip in the connection list so admins can see which connectors are limited at a glance.
### Personal MCP Connections
Personal connections are MCP servers you connect for yourself, separate from the workspace connectors your admins manage. Use them to give the agent your own tools, like Stripe, Notion, Linear, or Sentry, or your own internal APIs, when it answers your questions. Set them up from **Settings → Personal**, no admin required.
| | Workspace connector | Personal connection |
| ------------ | ---------------------------------------- | ------------------- |
| Set up by | Admins | You |
| Available to | All workspace members (or an allow list) | Only you |
| Runs as | Shared workspace identity | Your own identity |
Personal connections support any public HTTPS server that implements OAuth 2.1. Macroscope discovers the server's authorization endpoints and registers a client automatically, so there are no client credentials to enter: paste the server URL, complete the OAuth consent flow, and the connection is ready. Reconnect or disconnect at any time from the same page.